To create a Facebook group, go to facebook.com/groups/create, give it a keyword-rich name, choose Private visibility for higher engagement (or Public for maximum search reach), and set up to three membership questions. The five minutes of clicking is the easy part. What decides whether the group grows is the name you pick, the description and rules you write, and posting real content consistently for the first 30 days before and after you invite anyone.
Creating the group itself takes about five minutes. Most people finish that part, invite a few friends, post twice, and then watch the group sit dead for months. The setup choices you make in those first minutes, and the habits you build in the first month, are what actually separate a group that grows from one that stalls.
This guide covers both. First the exact steps to create the group and the settings worth getting right, then a realistic 30-day plan to take it from empty to active.
Decide Three Things Before You Create the Group #
Before you touch the create button, settle three decisions. Changing them later is possible but messy, and the first one shapes everything else.
1. The niche and the name #
Your group name is the single most important SEO decision you make. Facebook's search surfaces groups by matching the search term to the group name, and Google indexes public group names too. A name built around what your ideal member types into search will pull in members on its own, month after month, with no promotion.
Name the group around the keyword, not your brand. "Sarah's Marketing Hub" tells search engines nothing. "Etsy Sellers: Marketing and Growth" contains the exact terms people search. Keep it under about 50 characters so it does not get truncated in mobile search results, and put the primary keyword in the first two or three words. We go deeper on this in the Facebook group name ideas guide.
2. Public or Private #
Public groups are visible to anyone and their content can appear in Facebook and Google search, which helps discovery. Private groups require approval to see posts, which tends to drive higher engagement because members feel they are inside something exclusive.
For most communities built around a business or a topic, Private plus Visible (people can find the group in search but must join to see posts) is the strongest combination. It keeps the discovery benefit while protecting the sense of a real community inside.
3. Who it is for, in one sentence #
Write a single sentence that names exactly who should join and what they get. "A group for freelance writers who want to find better-paying clients" is specific enough to attract the right people and repel the wrong ones. You will reuse this sentence in the description, the first membership question, and your invitations.
If 20 large groups already exist for your exact keyword, you will struggle for visibility. Pick a more specific angle: not "Real Estate" but "First-Time Home Buyers in Austin". Smaller, sharper keywords bring in members with higher intent anyway.
How to Create a Facebook Group Step by Step #
With those decisions made, the creation itself is quick.
- Go to the create page. On desktop, open facebook.com/groups/create, or click the Menu icon and choose Groups, then Create New Group. On mobile, tap the menu, open Groups, and tap the plus icon.
- Enter your group name. Use the keyword-first name you chose. You can change it later, but early is better since a rename can briefly confuse existing members.
- Choose privacy. Select Public or Private. If Private, you then choose whether the group is Visible (findable in search) or Hidden. Visible is almost always the right call.
- Invite people (optional at this stage). Facebook prompts you to invite friends immediately. Skip this for now. You want content in the group before anyone arrives, which we cover in the 30-day plan below.
- Create the group. The group is live. Now the real setup begins.
Inviting 200 friends to an empty group is the fastest way to kill it. People join, see no posts and no members, and leave or mute it immediately. Seed content first, then invite in waves.
Set Up the Settings That Actually Matter #
A new group ships with blank defaults. Four of them are worth your time.
Cover photo #
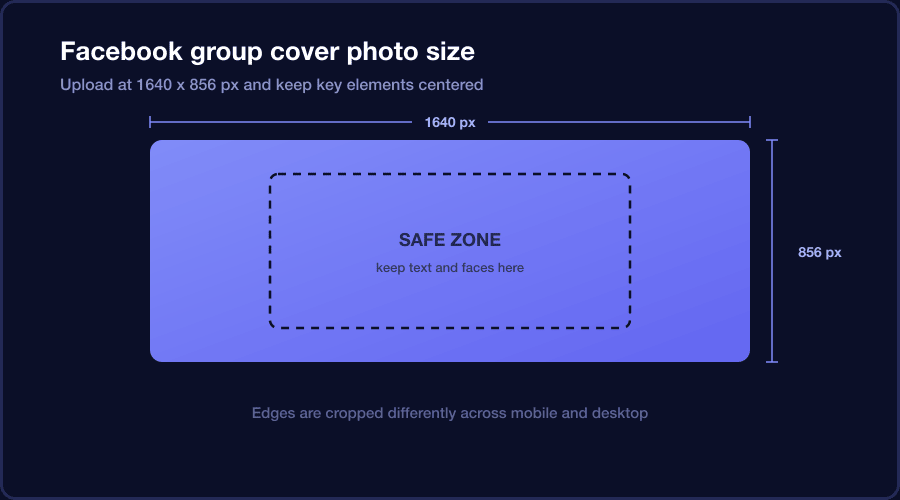
The cover photo is the first thing a prospective member sees. Facebook displays group cover photos at a wide aspect ratio, and the recommended upload size is 1640 by 856 pixels. Design at that size so nothing important gets cropped, and keep key text and faces near the center since the edges are trimmed differently across devices.
Description #
The description is indexed and shown in search previews, so the first 100 to 150 characters carry the most weight. Open with your primary keyword, then list the specific benefits of joining, state who the group is for, and end with a prompt to answer the membership questions. Aim for 150 words or more of genuinely useful, keyword-aware copy rather than a single vague line.
Rules #
Clear rules set the tone and give you something to point to when you remove spam. Four to six specific rules beat a long generic list. Post them as a pinned announcement, not just buried in the group info, so every member actually sees them. Our guide to writing Facebook group rules has templates you can adapt.
Membership questions #
You can ask up to three questions that prospective members answer before you approve them. These are the most underused feature in Facebook groups, and they do double duty: they filter out spam accounts and they build your email list. A proven set:
- A qualifying question: "What is your biggest challenge with [topic] right now?" This confirms genuine interest and hands you a steady stream of content ideas.
- An email capture question: "Would you like our free [specific resource] emailed to you? If yes, drop your email here." A meaningful share of applicants say yes when the resource is specific.
- A rule agreement: "Do you agree to follow the group rules?" This sets expectations before anyone is in.
Collecting emails through membership questions is common, but make sure you have consent to email people and that you follow your local privacy laws. Tell applicants what they are signing up for, and only email the resource and relevant follow-ups they expect.
Your First 30 Days #
This is the part almost everyone skips, and it is where groups are won or lost. Here is a realistic month.
Days 1 to 7: seed the group #
Before inviting anyone, publish 15 to 25 posts so the group looks alive when the first members arrive. Mix formats: a welcome and introduction post pinned to the top, a few genuinely useful tips, one or two questions that invite easy answers, and a poll. New members should land in a place that already has a rhythm, not an empty room.
Days 8 to 14: invite your warmest people #
Now start inviting, but only your warmest audience first: email subscribers, existing customers, close colleagues, and friends who genuinely fit the niche. Your first 50 to 100 members set the culture of the group, so choose them deliberately. Post daily and reply to every single comment. Early engagement signals to Facebook that the group is worth surfacing to more people.
Days 15 to 30: build the habit #
Keep a consistent posting cadence and start encouraging members to post. When someone shares something, respond generously and publicly so others see that participation gets noticed. Feature member wins. Cross-promote the group anywhere you already have an audience. By the end of the month you want a small but genuinely active community, not a big silent one.
One strong post a day, every day, outperforms ten posts in one burst followed by silence. The algorithm rewards steady activity, and members build the habit of checking in when they know fresh content is there.
Keeping the Group Active as It Grows #
The hardest part of running a group is not the launch, it is showing up every day for months. Missing several days in a row lets a group go quiet, and quiet groups are hard to revive.
This is where scheduling your own admin content helps. Planning a week of posts in advance and having them publish on a set cadence keeps the group fed even during busy stretches, so you are never staring at a blank composer. PilotPoster is a web app plus Chrome extension that can schedule and publish posts to the groups you run through your own browser session, which keeps a new community consistently active while you focus on replying and engaging. The full approach is in the admin auto-posting guide.
Frequently Asked Questions #
Is it free to create a Facebook group? #
Yes. Creating and running a Facebook group is completely free. There is no cost to create one, set it to Public or Private, or add members. You only pay if you later choose to run paid ads to promote it.
Should my Facebook group be public or private? #
Private plus Visible works best for most communities: the group is findable in search, but people must join to see posts, which protects engagement and community feel. Choose Public only if maximum reach and searchable content matter more than an exclusive feel.
How many members do I need before a group works? #
Engagement matters more than size. A group of 200 active members who post and comment is far more valuable than 5,000 silent ones. Focus the first month on activity and culture, not the member count.
Can I change my Facebook group name later? #
Yes, admins can rename a group in the settings, though frequent renames can confuse members and briefly disrupt search visibility. Pick a strong keyword-based name early so you rarely need to change it.
- Creating the group takes five minutes at facebook.com/groups/create, but the name, settings, and first 30 days decide whether it grows.
- Name the group around the keyword your ideal member searches, not your brand, and keep it under about 50 characters.
- Private plus Visible is the strongest privacy setting for most communities: findable in search, but engaging inside.
- Design your cover photo at 1640 by 856 pixels and keep important elements centered.
- Use all three membership questions to filter members and build your email list.
- Seed 15 to 25 posts before inviting anyone, then invite your warmest audience first and post daily.
- Consistency after launch is the real challenge; scheduling admin content keeps a new group from going quiet.